
Upgrading Windows Server 2012 EC2 Instances Part 2: In-place Upgrade
After detailing the necessary planning earlier, Brien moves on to the next step: an in-place upgrade of the Windows Server operating system to AWS EC2.
In my previous blog post in this series, I discussed some of the important considerations you should take into account when planning an operating system upgrade on an EC2 instance running Windows Server 2012 or Windows Server 2012 R2. Now I want to change my focus a bit and show you how to perform an in-place upgrade of the Windows Server operating system, especially regarding the process related to AWS EC2.
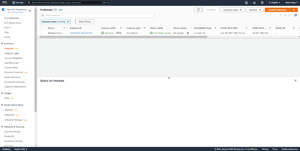
The first step in the upgrade process is to open the AWS EC2 console and locate the instance to upgrade. You will need to note the Instance ID and the Availability Zone of the instance. This information is presented on the main screen of the EC2 console. You can see an example of this in Figure 1.

The EC2Config service
The next thing you will need to do is remove the EC2Config service from the instance. The EC2Config service was used to run Sysprep on instances running Windows Server. However, it was only used before Windows Server 2016. As such, it will need to be removed before upgrading your operating system.
To remove the EC2Config service, connect to the EC2 instance, then open an elevated PowerShell instance. Enter the following commands in the PowerShell window:
Stop-Service EC2Config
SC delete ec2config
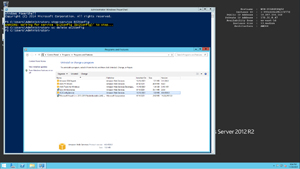
Once the service is stopped, the next thing you will need to do is open the Windows Control Panel, then click Uninstall a program. Select EC2ConfigService, then click the Uninstall link, as shown in Figure 2.
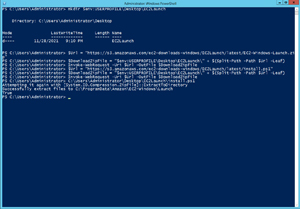
The next step in the process is to download and install the latest version of EC2Launch. It is important to ensure that you have a backup of the virtual machine (VM) instance before performing this step, as any existing EC2Launch configurations will be overwritten. You will need to enter the following commands in PowerShell:
mkdir $env:USERPROFILEDesktopEC2Launch
$Url = "https://s3.amazonaws.com/ec2-downloads-windows/EC2Launch/latest/EC2-Windows-Launch.zip"
$DownloadZipFile = "$env:USERPROFILEDesktopEC2Launch" + $(Split-Path -Path $Url -Leaf)
Invoke-WebRequest -Uri $Url -OutFile $DownloadZipFile
$Url = "https://s3.amazonaws.com/ec2-downloads-windows/EC2Launch/latest/install.ps1"
$DownloadZipFile = "$env:USERPROFILEDesktopEC2Launch" + $(Split-Path -Path $Url -Leaf)
Invoke-WebRequest -Uri $Url -OutFile $DownloadZipFile
C:UsersAdministratorDesktopEC2Launchinstall.ps1
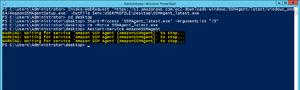
The next thing you will need to do is download and install an SSM Agent. To do this, you will need to enter these commands in the PowerShell window of the VM instance:
Invoke-WebRequest 'https://s3.amazonaws.com/ec2-downloads-windows/SSMAgent/latest/windows_amd64/AmazonSSMAgentSetup.exe' -OutFile $env:USERPROFILEDesktopSSMAgent_latest.exe
Cd desktop
Start-Process 'SSMAgent_latest.exe' -ArgumentList "/S"
rm -Force SSMAgent_latest.exe
Restart-Service AmazonSSMAgent
Now that you have installed the SSM Agent, you next need to create a new volume containing the installation media for the version of Windows you plan to install.
In the EC2 console, locate the Elastic Block Store section, then click Snapshots. At the top of the Snapshots window, you’ll see a filter bar. By default, this filter bar contains the text “belongs to me”. Click the drop-down arrow and choose Public Snapshots from the list.
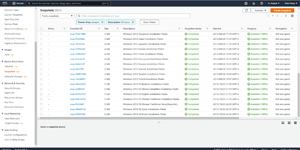
Now click on the search field and then select the Owner Alias option and set the owner alias to Amazon. Click on the search box again, but this time choose the Description option. Enter Windows as the description. This will cause all publicly available Windows snapshots offered by Amazon to appear in the snapshots list, as shown in Figure 5. You will need to locate the version of Windows you want to upgrade to. Keep in mind that the results are spread across multiple pages, so if you can’t find what you’re looking for, be sure to move on to the next page.
Once you locate the snapshot containing the version of Windows you want to upgrade to, select the snapshot and then select the Create Volume from Snapshot option from the Actions menu. This will cause AWS to display the Create Volume dialog box. Be sure to select the Availability Zone that matches the one used by the instance you are upgrading. Then click Create Volume.
At this point, you should see a message saying Volume created successfully. This message contains a link to the new volume. Click the link to access the volume details. Then choose the Attach Volume command from the Actions menu. Select your instance from the Instance drop-down menu, then click Attach Volume.

Now that you’ve attached the new volume to your EC2 instance, you’re almost ready to begin the upgrade process. I’ll show you the remaining procedures in Part 3 of this series.
About the Author
Brien Posey is a 21-time Microsoft MVP with decades of IT experience. As a freelance writer, Posey has written thousands of articles and contributed to several dozen books on a wide variety of computing topics. Prior to going freelance, Posey was CIO for a national chain of hospitals and healthcare facilities. He has also served as a network administrator for some of the nation’s largest insurance companies and for the Department of Defense at Fort Knox. In addition to his ongoing work in computing, Posey has spent the past few years actively training as a commercial scientist-astronaut candidate in preparation for flying on a polar mesospheric cloud survey mission. from space. You can follow his spaceflight training on his website.
Comments are closed.